K'nexion Geoscience Consulting home

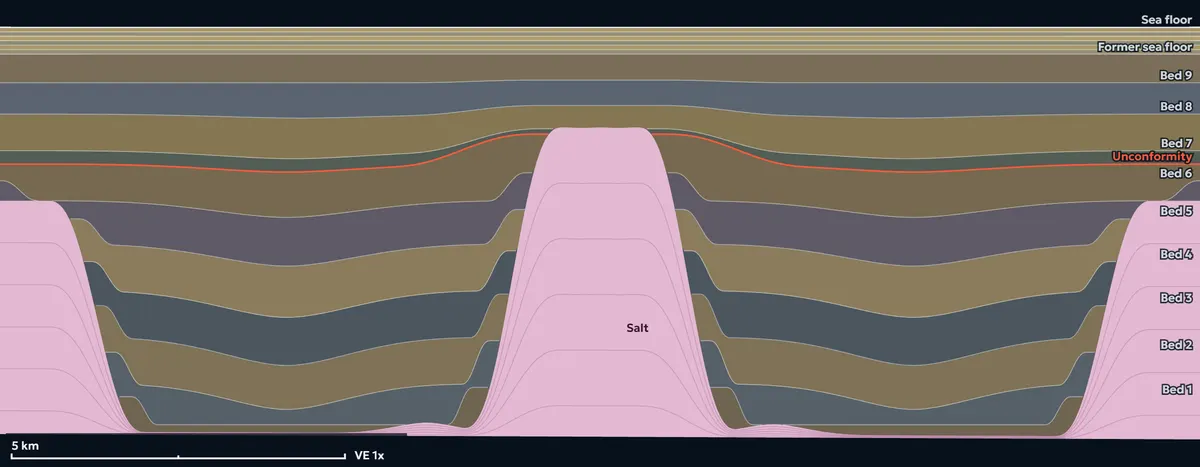
Grow, withdraw, stretch or squeeze salt in a cross-section and watch the rock above bend, break and record it in its strata. Pick a structure, edit the salt, then press Play, or load an experiment from Try this.

Salt Lab

The Salt Lab is for educational purposes only. Its simplified 2D models are not fully realistic and do not replace seismic interpretation, restoration or geomechanical modelling of any real prospect, but they are realistic enough to build intuition about multi-phase kinematic deformation of a reservoir.

Time

Plays the next stage, then stops.

Readouts at this moment of the timeline

Regime
–
Salt remaining
–
Diapir height
–
Stem width
–
Roof over the crest
–
Rim syncline vs crest
–
Overhang
–
Welds
–
Crestal faults
–
Sediment to rise
–

Loading the section.

Drag the filled Source arrow and the outlined Sink arrow along the top of the salt, or tap the salt to move one. Slide Inflate at the source: with Preserve salt volume on, the sink gives the same salt. Then press Lock stage and edit again, or start from one of the experiments under Try this.

  • Salt (halite)
  • Sand
  • Heterolithic
  • Shale
  • Pre-, syn- and post-kinematic packages (left edge)
  • Normal fault (throw in metres)
  • Reverse fault
  • Unconformity
  • Onlap termination
  • Mass-transport deposit
  • Slope-failure scar
  • Overturned bed (ticks point to younger beds)
  • Source arrow (inflate) and its width
  • Sink arrow (withdraw) and its width
Salt supply

A passive salt wall with an irregular crest 1.1 km deep, steeper on its left flank, between two minibasins sinking onto primary welds; a low salt roller and a neighbouring stock rise at the section edges.

On: salt only moves. What the source gains, the sink gives, through connected salt. Off: salt can enter or leave the section (external supply or loss).

Source arrow
0%

Salt added under the filled arrow, as a share of the salt inside its width. Double-tap to return to 0.

2.5 km
Sink arrow
0%

Salt taken from under the outlined arrow. With Preserve salt volume on, it follows the source, and the salt beside it gives the rest if it runs out.

2.5 km

Salt moved: none yet. Total salt unchanged.

Tapping the section moves

Salt rises up a fault that runs from the salt to the sea floor.

Sedimentation
0 m

Metres of new sediment. It fills the lows first and onlaps the highs.

Extension or shortening
None

Left: extension; right: shortening, in % of the force that breaks a 2.5 km roof on its own. The thinnest roof, over the salt crest, feels it most.

Stages

Move the salt, add sediment, push or pull, or combine them, then press Lock stage to keep it and start the next stage from the new section (up to 20).

View
Faults now
FaultTypeThrow
No faults yet.

Try this

Each experiment loads its stages and plays them. The callouts and the readouts under the section change as it plays.

  • Bend before you break. Inflate the salt wall's crest +30%, drawing the salt from the wall's foot. What to look for: two crestal faults break the roof over the crest, the one on the right throwing most as the right minibasin sinks toward its weld; the regime turns Active and the salt readout stays at 100 %.
  • Feed the wall from its minibasin. Twice, move salt from under the right minibasin into the wall, then lay down 200 m of sediment. What to look for: the minibasin sinks toward a primary weld (the Weld readout grows), and each new bed is thickest in the sinking basin, as growth strata.
  • Collapse. With Preserve salt volume off, withdraw 45% of the salt from the crest (salt dissolved, or flowing out of the section). What to look for: the roof sags into the salt along collapse faults that dip toward it; the regime reads Falling, the stage is labelled external and the salt readout drops to about 85 %.
  • Make salt erupt. Inflate the crest +40%, then Erupt. What to look for: salt rises up the crestal fault zone and spreads over the sea floor as a salt glacier (a namakier), drawn from the wall below; the roof readout drops to none and the salt readout stays at 100 %.
  • Bury the salt glacier. Erupt, then lay down 450 m of sediment. What to look for: the glacier becomes a buried allochthonous salt tongue under a post-kinematic drape, with a subsalt trap callout under its edge.
  • Pillow to diapir. Drag Rise to 46%. What to look for: the layer swells into a pillow, crestal faults break its roof and the regime turns Active, then the crest reaches the sea floor and it turns Passive, just before the salt breaks out.
  • Reactive diapir under extension. Pull the section apart while the ridge rises, twice, drawing the salt from the source layer on the right. What to look for: a large normal fault breaks the roof over the triangular ridge (load the same stages without extension and it throws less than half as much); the regime reads Reactive.
  • Squeeze a stock. Shorten the section while the stock rises. What to look for: reverse faults (blue) cut the roof over the crest instead of a graben.
  • Grow a turtle. Six times, move salt from a minibasin flank into the salt high beside it, alternating sides. What to look for: the flanks sink and fill, and the thick centre of the basin stays high as a turtle anticline.
  • Weld and turtle structure. Move salt harder from both flanks into the highs while sediment piles in. What to look for: the source runs out under both flanks, the Weld callout and readout appear, and the turtle sits between the welds.
  • From layer to tongue. Drag Rise to 100%. What to look for: a tabular layer becomes a pillow, a diapir, then an allochthonous salt tongue spreading over a weld.
  • Roll a megaflap. Inflate the stem under its salt tongue three times. What to look for: the steep beds roll under the tongue and turn past vertical; the small ticks point to the younger beds.
  • Subsalt trap below an overhang. Raise the stem twice. What to look for: the upturned beds seal against the base of the salt tongue, under the Subsalt trap callout, a target imaged only through the salt.
Step by step
  • Bend before you break. On the salt wall, tap the crest and inflate to +5%: the roof bends but nothing fails. Now go to +30% and press Play: a keystone graben opens over the crest.
  • Collapse. Deflate the same crest to −30% with the arrow on its shoulder: the roof sags and collapse faults appear, dipping toward the salt.
  • Make salt erupt. On the salt wall, leave the arrow on the crest, slide Inflate or deflate to +40% and press Erupt. Faults now run from the salt to the sea floor, so the salt rises up that crestal fault zone and spreads over the sea floor as a salt glacier (a namakier). Press Play to watch it. If nothing erupts, the note under Erupt says exactly how much more to inflate.
  • Reactive diapir under extension. Pick Reactive diapir under extension, slide Regional push or pull to Extension 80%, inflate the ridge +30% and press Lock stage; deposit 150 m, then inflate +20% with the extension again. Do the same without extension and compare the faults.
  • Grow a turtle. In the minibasin preset, salt withdraws from under one flank and then the other, six times, each time a little more (−30%, −40%, −50%), with 150 m of sediment after each stage. The flanks sink and fill, while the thick centre of the basin is left standing high as a turtle anticline.
  • From layer to tongue. Pick Autochthonous to allochthonous and drag Rise from 0 to 100%: a pillow becomes a diapir, breaks through its faulted roof, spreads as an allochthonous salt tongue and leaves a weld behind.
  • Roll a megaflap. Pick Diapir with a salt tongue and inflate the stem +20%, Lock, then again with some sediment. The steep beds beside the stem roll under the salt overhang and turn past vertical; the small ticks point to the younger beds.

How salt moves

Rock salt is weaker than the rocks around it and, once buried a kilometre or two, lighter than them, so over millions of years it flows like a very thick fluid. Sediment piled unevenly on it squeezes it toward the lightly loaded side. It swells into a pillow, then pierces its roof as a diapir where extension thins the roof or the rising salt breaks it. Once its crest reaches the sea floor it grows passively as sediment builds up around it, and it can spread as a salt glacier or a buried salt tongue. Where the source layer runs out, the rocks above and below it meet at a weld.

Trusheim (1960); Vendeville & Jackson (1992); Hudec & Jackson (2007); Jackson & Hudec (2017).

Glossary

Autochthonous salt
Salt still in the layer where it was deposited: the source layer at the base of the section.
Allochthonous salt
Salt that has flowed out of its source and now lies on younger strata, as a tongue, a glacier or, where tongues merge, a canopy.
Salt pillow
A low, broad swell of salt with gentle flanks under an unbroken, gently folded roof.
Diapir: stock and wall
Salt that has cut through its roof: a stock is round in map view, a wall is long and narrow.
Reactive, active and passive diapirism
Reactive: extension thins the roof and the salt rises into the graben. Active: the salt lifts and breaks its own roof. Passive: the crest stays at the sea floor while sediment builds up around it.
Namakier (salt glacier)
Salt that has reached the surface or the sea floor and flows across it like a glacier.
Primary and secondary weld
Where the source layer is used up, the rocks above and below meet at a primary weld; where a diapir stem is squeezed shut, its two walls meet at a secondary weld. A few tens of metres of salt may remain.
Rim syncline (peripheral sink)
The basin of thickened strata beside a rising diapir, filled as salt flows out from under it: primary as the pillow grows, secondary once the diapir pierces.
Minibasin
A basin of sediment sinking into salt between salt highs.
Turtle structure
An anticline in a minibasin's lower fill, left standing when the salt under its flanks withdraws and its thick centre stays high.
Halokinetic sequence: hook and wedge
Strata bounded by unconformities that are folded up against a diapir: hooks fold within a narrow zone (50–200 m) and turn up steeply; wedges fold gently over 300–1,000 m.
Drag zone and megaflap
Beds turned up against a diapir flank; a megaflap is a panel of them rotated to vertical or beyond, often under an overhang.
Crestal and collapse faults
Normal faults over a rising crest, often a keystone graben; collapse faults form the same way when salt withdraws and the roof sags into it.
Roof (carapace)
The strata over a diapir's crest, thinned as the crest rises.
Pre-, syn- and post-kinematic
Deposited before the salt moved, while it moved (thickening into the rim synclines and thinning over the highs), and after it stopped (draping it at an even thickness). The bar at the section's left edge marks them.
Onlap
A bed ending against an older, sloping surface it was deposited against; the arrows on the section mark these terminations.
Mass-transport deposit
Sediment that failed on a slope too steep for it and came to rest in the low below, with a scar left on the slope.
Downbuilding
A diapir's crest stays near the sea floor while the basins beside it sink and fill: the salt seems to rise, but the sediment goes down.
Subsalt trap
A reservoir sealed beneath salt, often upturned beds sealed by the base of an overhang; it is imaged only through the salt.

Where to see these structures

What this model obeys

  • Salt behaves as an incompressible fluid: it never faults, and its top is always one smooth curve.
  • Salt and rock always touch: no gap and no overlap along the salt contact, and no fault enters the salt.
  • With Preserve salt volume on (the default), salt only moves: what the source arrow gains, the sink arrow gives, and Feed and Erupt draw their salt from the salt below them, so the salt area stays the same; the Rise scenario keeps it too. With it off, salt entering or leaving the section is labelled external supply or loss.
  • Salt flows only through salt: the sink must be joined to the source by salt thicker than a weld (50 m), neither arrow sits on a weld, and a weld never re-opens.
  • Salt at the sea floor spreads rather than standing up: the source cannot inflate salt under less than 50 m of rock, and no edit lifts the sea floor more than 1.5 km above the deepest sea floor in the section, where slopes fail and the roof erodes.
  • Every edit is solved for stress in the overburden: gravity, density that rises with depth, and elastic bending above the moving salt.
  • A fault forms only where the stress exceeds the rock’s Mohr-Coulomb strength. Below that, the beds just bend.
  • Faults form at about 30° to the most compressive stress: about 60° dips for normal faults, gentler dips for thrusts, which appear only where the rock is squeezed.
  • A fault grows only while the rock at its tip is above strength, and it stops at the salt top.
  • Existing faults are weaker than intact rock, so they slip again before new ones form nearby.
  • Hanging walls slide along their faults, beds keep their area within 1 %, and outside drag zones they keep their thickness measured along the shear direction.
  • A bigger edit gives at least as many faults, with at least as much throw; a zero edit changes nothing.
  • Where a salt tongue overhangs the beds beside its stem, a rising stem drags them up and rolls them under the overhang: they can pass vertical and overturn (megaflaps), with no gap or overlap at the salt and their area kept within 1 %. Ticks on an overturned bed point to the younger beds.
  • New sediment fills the lows first: it is thickest in basins, thins over highs and onlaps them, and it holds exactly the amount you deposit.
  • Sediment deposited while the salt moves pushes salt from under its thickest part toward the highs (downbuilding), and the salt area does not change.
  • No slope stands steeper than the repose angle of the bed it exposes: 5° for the youngest bed, rising with each older bed to 35°. Steeper slopes fail, leave a scar, and the same amount of sediment comes to rest in the low below as a mass-transport deposit.
  • In the salt-tongue scenarios, salt fed up the feeder advances the tongue’s nose toward the side you choose; where sediment was deposited in front, the tongue climbs over it.
  • Salt erupts only where a fault already runs from the salt to the sea floor: it rises up that fault zone as one smooth surface and spreads at the sea floor as a glacier.
  • Regional extension or shortening is one horizontal force carried by every column of the roof above the salt, so the thinnest roof, over the crest, feels it most: extension breaks it first (reactive diapirism) and shortening squeezes it into reverse faults. It never moves salt on its own.
  • The same preset and edits give the same section on every device, and a shared link rebuilds it exactly.

How it works

Salt flows. Over geological time rock salt behaves like a very thick fluid, so here it has no strength: its top stays one smooth curve and it fills whatever space the rock above leaves.

The rock above is brittle. Each edit is solved for stress with a finite-element model of the overburden: its weight, density that rises with depth, and the bending the salt forces on it.

Faults form only where stress beats strength. Where the stress stays below the rock's Mohr-Coulomb strength the beds just bend. Where it is exceeded, a fault starts and grows only as far as the rock keeps failing.

What is simplified

The section is 2D, the rock is elastic with an effective long-term stiffness, and blocks deform by vertical shear rather than moving as rigid pieces. Faults keep zero throw where they reach the salt, so the salt top stays smooth. The full account is in the lab's notes on the physics.

Textbook geometry rules are simplifications too: finite-element models of rising diapirs show that upturned flaps beside salt can fail in shear, and that cross-sectional area and bed lengths are not necessarily preserved. The Salt Lab relies on simple rules like these, which is exactly why it is a learning tool and not a prediction. Nikolinakou, Heidari, Hudec & Flemings (2017), AAPG Bulletin (opens in a new tab)

Why salt matters for reservoirs

  1. Growing salt steers the sand.

    Channels rerouted where salt structures grew fast (15 m or more of bed-length change per million years); sand-rich fans ponded where growth was slow (under 10 m).

    Doughty-Jones (2014), PhD thesis, Imperial College London (opens in a new tab)

  2. Timing decides connectivity.

    Sands first trapped in minibasins later bypassed them, then rising salt walls cut the older systems. Whether a sand body is connected or chopped up depends on when the salt moved.

    Rodriguez Rondon (2017), PhD thesis, Imperial College London (opens in a new tab)

  3. A “weld” may not be sealed at all.

    Up to about 50 m of salt can remain in a weld, and seismic usually can't tell a partial weld from a complete one. Thin, broad welds offshore Brazil were likely to leak.

    Wagner (2010), PhD dissertation, The University of Texas at Austin (opens in a new tab)

  4. Under the salt, the picture itself is uncertain.

    Subsalt images rest on a velocity model that is never known exactly, so where the structures really are is uncertain, yet usually only one image is interpreted.

    Li, Caers & Sava (2015), The Leading Edge (opens in a new tab)

More ways salt shapes reservoirs

  1. Salt is a slow-motion fluid.

    Over geological time, rock salt behaves less like rock and more like a very thick fluid. It moves when uneven loading from the sediments above is strong enough to overcome the strength of its cover and the drag along its edges.

    “Salt is mechanically weak and flows like a fluid, even at geologically rapid strain rates.”

    Hudec & Jackson (2007), Earth-Science Reviews (opens in a new tab); open summary (opens in a new tab)

  2. One basin, many deformation phases.

    A single salt-withdrawal minibasin can record more than 70 million years of shifting deformation: extension and faulting, then piecemeal welding, then a turtle structure, then squeezing. Each phase moved the depocentre, so reservoir sands of different ages can sit in different parts of the same basin.

    Ge et al. (2019), Basin Research (opens in a new tab)

  3. Beds bend, thin and fracture right next to a diapir.

    Next to a rising diapir, strata are dragged upward and thinned into unconformity-bound packages. “Hook” packages fold within a narrow 50–200 m zone with more than 70 degrees of angular discordance and abrupt facies changes, while “wedge” packages fold gently over 300–1,000 m. Core from a diapir flank shows fracturing tied to this drape folding.

    Giles & Rowan (2012), Geological Society Special Publications (opens in a new tab); Abu (2023), PhD thesis, Imperial College London (opens in a new tab)

  4. Faults appear only where the salt pushes hard enough.

    Kilometre-scale radial faults around a salt stock form first as the roof over the stock stretches. Later, the widening salt stem pushes on its flanks and creates or reactivates more faults. These faults control fracture patterns, fluid pathways and reservoir compartments around the diapir, and can line up stacked reservoir targets.

    Coleman, Jackson, Duffy & Nikolinakou (2018), Geology (opens in a new tab); Coleman (2018), PhD thesis, Imperial College London (opens in a new tab)

  5. Salt leaves a stress fingerprint that lasts millions of years.

    Geomechanical models show that salt loading creates pore-pressure anomalies reaching kilometres into nearby mudstones, and these can take millions of years to dissipate. As a salt layer welds, stress jumps in the sediments near the weld tip, which can compact, fracture or fault them. Both effects matter for drilling and for producing reservoirs near salt.

    Nikolinakou, Luo, Hudec & Flemings (2012), AAPG Bulletin (opens in a new tab); Heidari, Nikolinakou, Hudec & Flemings (2016), Tectonophysics (opens in a new tab)

  6. Production feels the salt too.

    In coupled flow-and-deformation simulations of a reservoir pierced by a salt dome, 13 years of production changed stress differently next to the salt than in flat-lying parts of the reservoir. Reservoir dip, salt creep and well location all changed the pressure drawdown, the stress path and how much the reservoir compacted.

    Hernandez Riveros (2018), graduate thesis, The University of Oklahoma (opens in a new tab)

Two cases from public seismic

Both presets were built from public-domain seismic profiles from the deep-water Gulf of America.

Deep-rooted salt stocks and pillows
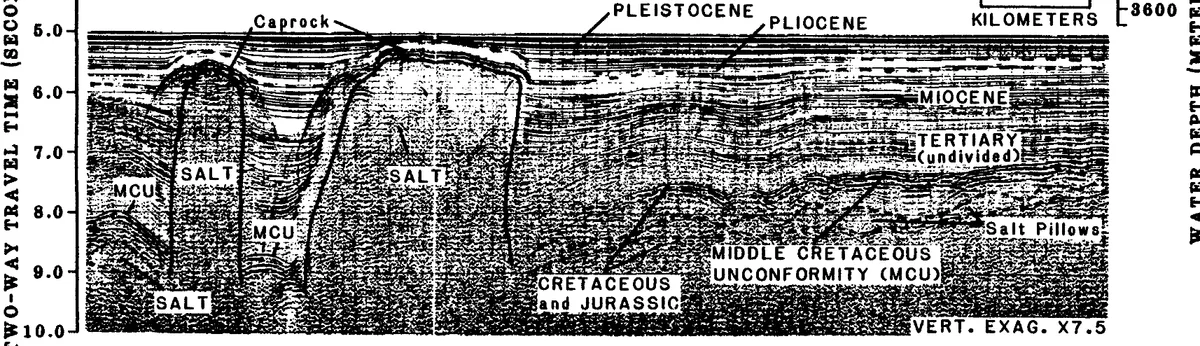
Black-and-white seismic profile: two steep-sided salt stocks with flat, caprock-topped crests rise through layered sediment from deep salt; beds turn up against their flanks, an unconformity cuts the older beds, and low salt pillows lie to the right.

Two caprock-topped salt stocks rise from deep salt; older beds turn up on their flanks.

Image: U.S. Geological Survey Open-File Report 81-265 (R.B. Powers, editor, 1981), part of figure 19; seismic data acquired by the University of Texas Marine Science Institute. Public domain. Cropped and resized only. Source report (opens in a new tab)

Read the case

Two salt stocks rise from the deep salt source to just below the sea floor: a narrow one with a rounded top and a broad one with a flat crest, both capped by caprock. Older beds bend up against their flanks, a regional unconformity cuts across them, and the younger beds drape both crests. Low salt pillows lie to one side. The vertical scale is two-way travel time, exaggerated about 7.5 times.

How this preset was built from this image

The two stocks keep the image's order, their rough spacing and their relative widths: a narrow stock and a broad, flat-crested one, both rooted in a source about 6 km deep. The three oldest beds use the flank-upturn shape, so they climb against both stocks; an unconformity truncates them, and four younger beds thin over both crests. Two low pillows sit to the right, as in the image.

The section is drawn in depth with no vertical exaggeration, so the stocks look narrower than in the 7.5 times exaggerated image. Caprock is not a separate layer here; it shows only as the flat crest of the broad stock. The seven-stage demo keeps the salt volume: it grows the broad stock while sediment is laid down, lets the basin downbuild under a new deposit, inflates the narrow stock, deposits again, moves salt from between the stocks into the narrow stock while the sag fills, buries the broad stock under a last deposit and finally inflates it once more.
Allochthonous salt front over the continental rise

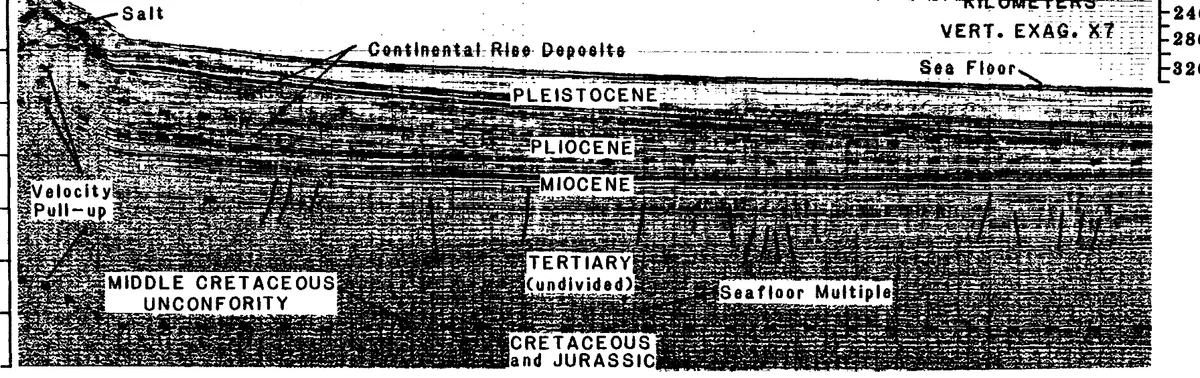
Black-and-white seismic profile: on the left, salt stands at the sea floor at the steep front of a body of allochthonous salt; to the right, a wedge of layered continental-rise deposits thins away from it above older, deeper strata and a regional unconformity.

The front of allochthonous salt stands at the sea floor, with younger rise deposits thickening toward it.

Image: U.S. Geological Survey Open-File Report 81-265 (R.B. Powers, editor, 1981), part of figure 16; seismic data acquired by the University of Texas Marine Science Institute. Public domain. Cropped and resized only. Source report (opens in a new tab)

Read the case

At the left, the front of a body of allochthonous salt stands at the sea floor and drops steeply onto the continental rise. A wedge of younger rise deposits thickens toward the salt front and thins away from it, above older strata and a regional unconformity. The steep dark streaks under the salt are a velocity pull-up, and the deep repeat of the sea floor is a multiple: both are imaging effects, not geology. The vertical scale is exaggerated about 7 times.

How this preset was built from this image

The salt tongue runs off the left edge of the section, as the salt does in the image, with its front about 5.6 km in, resting on the sea floor with a steep face toward the rise; its base ramps down toward the feeder. A narrow feeder below it closes into thin source salt. Four flat-lying beds and an unconformity sit under the salt and the rise, so the sediment in front of the tongue can build up against it.

The seven-stage demo feeds the tongue five times, each time while 100 to 120 m of sediment is laid down, with two downbuilding deposits between the feeds; the fed salt comes from the thin source layer around the feeder, so the salt volume stays the same. The first feed takes most of that layer, which welds beside the feeder, so the later feeds add less and less, the way a feeder is starved. The front advances over the sea floor, the rise beds onlap it, and in the end the tongue is buried under the youngest beds. Like the image, the preset is a two-dimensional cut, and the salt's real three-dimensional shape is not known from one profile.

Further reading

Working a structure near salt? Talk it through with Ben.